How to Plan a Kitchen Cabinet Layout That Actually Works for Your Space
Layout Is the Decision Everything Else Depends On
Most kitchen renovation regrets don't come from choosing the wrong finish or the wrong hardware. They come from a layout that looked fine on paper but created friction every single day — a cabinet door that blocks the refrigerator, a drawer bank that can't fully open, a pantry column placed where foot traffic naturally wants to flow.
Getting the layout right before specifying custom cabinets for kitchen spaces isn't a preliminary step. It is the most consequential design decision in the entire project.

Start With How You Actually Use Your Kitchen
Designers often begin with an audit, not a floor plan. Before drawing anything, ask:
- How many people cook simultaneously, and do they need separate prep zones?
- Where do groceries enter the kitchen, and where do they get stored?
- Is the kitchen also a social space — do people gather here while someone cooks?
- What appliances are used daily versus occasionally?
- How much counter space do you actually use, versus how much you want for visual breathing room?
These questions produce a usage map. That map should drive every dimension decision in your custom kitchen cabinet plan — not the other way around.
The Work Triangle Is Still Relevant — Just Not Absolute
The classic kitchen work triangle connects the refrigerator, sink, and range into a triangle of movement. It remains a useful planning principle, but modern kitchens have complicated it. Open-plan layouts, kitchen islands, and multi-cook households often call for a work zone approach instead.
Work zones organize the kitchen into functional areas:
- Prep zone: Counter space + knife storage + cutting board access
- Cooking zone: Range or cooktop + immediate pan and utensil storage
- Cleanup zone: Sink + dishwasher + drying and sorting space
- Consumables zone: Pantry, refrigerator, and everyday item storage
- Social zone: Island seating, coffee station, or secondary counter
Custom cabinets for kitchen layouts built around zones rather than a single triangle produce kitchens that work better for multiple users and adapt more naturally to different cooking styles.
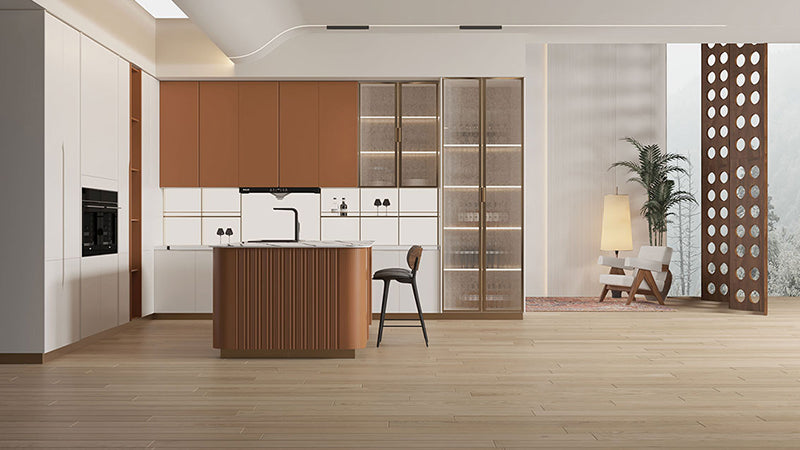
Common Kitchen Configurations and Their Cabinet Implications
The Galley Kitchen
Two parallel runs of cabinetry with a corridor between them. Efficient for single-cook households, but requires careful attention to aisle width — a minimum of 42 inches for one cook, 48 inches for two. Cabinet depth on both sides matters here: standard 24-inch base cabinets on opposing walls can quickly make a galley feel like a hallway.
In galley kitchens, vertical storage becomes critical. Tall pantry cabinets at one or both ends of the run can dramatically increase capacity without consuming floor area.
The L-Shaped Kitchen
Two perpendicular cabinet runs meeting at a corner. The corner itself is the planning challenge. Standard lazy Susans are a common solution, but they waste significant space. Better options include:
- Blind corner pull-out systems that bring items fully forward
- Diagonal corner cabinets with a wider door opening
- Dead corner storage intentionally designed for rarely-used items, freeing prime locations for daily-use storage
The U-Shaped Kitchen
Three walls of cabinetry enclosing a central work area. Maximum storage and counter space, but requires enough square footage to avoid a cramped work triangle. The standard recommendation is a minimum 8-foot interior dimension between opposing cabinet faces.
U-shaped kitchens benefit enormously from custom cabinet specifications — because standard modular sizing rarely fits three walls cleanly without awkward filler strips or wasted corner space.
The Island Kitchen
An island adds a fifth cabinet run to any of the above configurations. It can serve as additional storage, secondary prep space, seating, or all three. The island cabinet design needs to be planned in coordination with the perimeter layout — not treated as an afterthought.
Key island dimensions to plan around: a minimum 42-inch clearance on all working sides, and a seating overhang of at least 12 inches (15 inches preferred) for comfortable knee clearance.
Upper Cabinet Placement: Height, Depth, and Spacing
Standard upper cabinet placement sits 18 inches above the countertop. This is a convention, not a rule — and it's worth questioning for your specific situation.
Taller users often prefer 20–22 inches of clearance. Kitchens with under-cabinet task lighting may need additional space for the fixture. Spaces with lower ceilings sometimes benefit from upper cabinets that start higher and run taller, maintaining the proportional relationship between cabinet and ceiling.
Upper cabinet depth is almost always 12 inches — but open shelving sections can use shallower depths (8–10 inches) to avoid a boxed-in feeling while still providing display and everyday-item storage.

Base Cabinet Depth and Drawer Configuration
Standard base cabinet depth is 24 inches, matching standard countertop depth. But custom specifications open up useful variations:
- Shallower base runs (18–21 inches) work well along secondary walls or in tight galley configurations
- Deeper base cabinets (27–30 inches) at island locations can dramatically increase storage volume
- Full-depth drawer banks — three or four drawers running the full height of the base cabinet — outperform doors with interior shelving for most storage categories
The shift from door-and-shelf base cabinets to drawer-dominant base configurations is one of the most significant functional upgrades available in a kitchen remodel. Items stored in drawers are visible and accessible without crouching. Items stored behind doors on interior shelves are often forgotten entirely.
Planning for Appliances Before the Cabinets Are Ordered
One of the most common and costly layout mistakes is finalizing cabinet dimensions before appliance specifications are confirmed. Built-in refrigerators, panel-ready dishwashers, and integrated range hoods all have specific rough opening requirements that must be reflected in the cabinet plan.
This is where working with a manufacturer that offers genuine customization — not just standard modules in standard increments — makes a measurable difference. Manufacturers like Goldenhome, with over 27 years of custom cabinetry production experience, can accommodate non-standard openings, asymmetric layouts, and site-specific constraints that off-the-shelf products simply cannot address.
The Layout Review Before You Finalize
Before submitting final cabinet specifications, walk through these checks:
- Do all cabinet doors and drawers open fully without conflicting with each other or adjacent appliances?
- Are the highest-use storage locations (pots, everyday dishes, prep tools) within the most ergonomically accessible zones?
- Is there adequate counter space on both sides of the range and sink?
- Does the layout accommodate the lighting plan — under-cabinet strips, pendants, recessed fixtures?
- Have electrical outlet locations been confirmed and reflected in the backsplash and upper cabinet plan?
A layout review at this stage costs nothing. Changes after installation cost significantly more — in money, time, and the frustration of living with a kitchen that almost works.
Custom cabinets for kitchen spaces represent a significant investment. The layout is where that investment either pays off every day or falls short of its potential. Get it right first.